Changing and making Body Data
Often, people use existing sprite pictures in order
to create new norn breeds. Now and then one would
like to "extend" the sprites to attach
additional body parts, such as wings etc. That leads
to the problem of changing the body data, since
the body parts in the game don't seem to fit to
each other any more. But let's start with some explanation
first...
Norns in the game are "made" out of single
pictures, for head, body, arms, legs and tail. Just
like a marionette. The game needs data how to "puzzle"
them together. Of course, you don't want a foot
attached to the head! Therefore you need the body
data. They "tell" the game engine how
to make the norn out of the picture pieces.
By means of the body data, each sprite picture
gets a set of points defined, where other points
in pictures of other body parts get attached. Imagine
a piece of cardboard attached to another piece and
a needle is put through that point. Those pieces
are attached to each other, but they can be moved
around that fixing point independently. The data
consist of two values: the X and Y coordinates in
amounts of pixels relative to each picture. If you
enlarge such a picture, of course, the "fixing
point" also moves in the picture relative to
it's coordinates and you need to change the value
of the X and Y coordinates in the body data file.
As an example, I'll explain the changes I had to
make, when I attached wings at the body of the Winged
Pixies in the life stage "child".
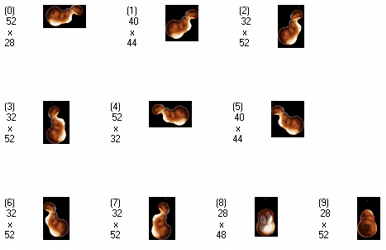
If you open the sprite file b01j.s16 (body sprites
for "child" of the Pixies) in the Spritebuilder,
it looks like this. There are 10 pictures, numbered
from 0 to 9 (numbers are in brackets).
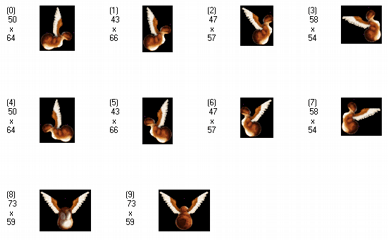
This is the new sprite file with the
"winged" body sprites. It's obvious to
see that the pictures are far more larger than the
original sprite pictures seen above. You can see
how big the pictures are, the size is shown beside
each picture in numbers of pixels, e.g. 50 x 64
right below the number in brackets which we learned
is the number of the picture in the file.
Now let's have a closer look at one
of the pictures. I take number 8. This is the body
showing from the front.

That's how the original body front
looks when you open it in the program "Paint".
Enlarge it to 600% and you can see each pixel. Can
you see the pink pixel in the upper part of the
picture? I let a red arrow point to it. Go there
with your cursor. Now read the values in the lower
right corner...wait... it's too small on this picture,
I enlarge it:

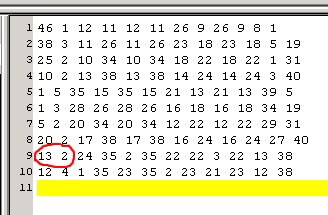
The number in front of the comma (in
this case a "13") is the value for the
x-axis, behind the comma (here a "2")
for the y-axis. Understood? The pixel is very easy
to find. Just count 13 pixels to the right and 2
pixels from above and you got the position where
the pink pixel is located in the picture. (Actually,
if you really count the pixels, there are 14 pixels
to the right and 3 downwards, but the first pixel
line is numbered with a "0", so start
counting with 0 not with 1!) Oh, and now you already
know that the 0-point for this coordination system
of pixels is in the left upper corner.
Now let's have a look at the original
body data file for this sprite file:
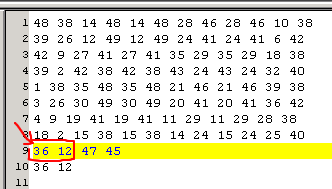
I marked the coordinates we found
above in red. See that it's in line 9? Well, my
text program starts counting the rows with 1, but
the pictures in the sprite file start with a number
0. Do don't get confused! The ninth row corresponds
therefore to the eighth picture in the sprite file!
And what do the other numbers mean
in the same line? Well, the body needs six attachment
points in total. One for the head, two for the arms,
two for the legs and one for the tail. Each attachment
point needs a x- and a y-axis coordinate, which
means, in total there must be 12 numbers. And they
are just written one after the other in one line
(head, left leg, left arm, right leg, right arm,
tail). Each of these lines has the corresponding
picture in the sprite file.


Now this is the new sprite picture
with the wings attached to the body. Now point the
cursor again to that pink pixel above the body.
Now read the value. Of course, it got larger, since
the picture got larger as well.
This value has to be put in the same
position in the body data:
Now you have the first attachment
point in the picture. Now you're able to calculate
all the other attachment points of the body, since
the attachment points relatively to the body picture
didn't change. They're just lay on other coordinates.
Add resp. subtract the difference between the new
coordinate value minus original coordinate value.
All you need is a little bit of patience and a calculator.
Or use an excel sheet.
Usually, attachment points aren't
painted in pink in the sprite files. So I sometimes
marked them (of course, not permanently!) with another
bright colour in the original picture, in order
to be able to find them easier in the changed picture.
For this it's easier also to have two windows of
"Paint" openend, one with the original
picture, one with the new version. Once an attachment
point is marked in a completely other colour, it's
much easier to find the same point in the new version
picture. Then take the coordinate values via the
cursor and the value shown in the lower right corner
in Paint, just as we did before. And then calculate
the other attachment points or look for them in
the picture.
Available for C2 is also the Attachment
Editor from Creaturelabs. It's pretty useful
once you're know your way around. ;-) The method
I've shown is a bit more time consuming, maybe,
but can be applied also to breeds of all Creatures
versions.